The prototype for this model is an absolutely tiny diesel loco which is surprisingly similar to the Ferrymead 2ft Gauge Railway's Planet loco. I just found the plan on my hard drive one day and thought "why not?!" and the rest is history, as they say.
What follows are some very rough instructions for building this small diesel loco. THe real thing was most probably used in a coal mine or similar, where clearances would be very small. Hence the loco is positively tiny.
The plan I found on my hard drive; not entirely sure where it came from though!

I imported this into Macromedia Freehand and scaled it to give 32mm between the wheels, then printed the result. After a few quick calculations etc, I went back into Freehand and cutting plans. These were printed and then stuck onto the metal I had with double sided tape.
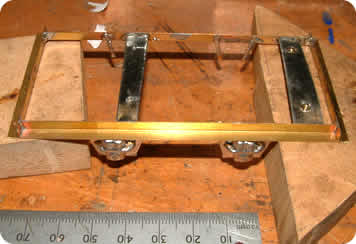
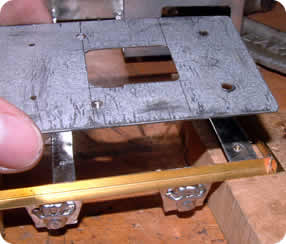
The base was pretty simple. I cut four lengths of brass L section and soldered them together. The a floor was cut from some thick steel to the same size. To join the two parts (since the steel was plated and couldn't be soldered), I placed some metal strips across the brass section, then screwed through from the floor. This also makes it easy to completely disassemble the loco which is handy when painting.
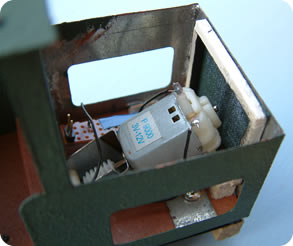
About $10 is all that's needed to build this part. A quick trip to the local Dick Smith Electronics yielded an assorted pack of gears and a small 9v motor.
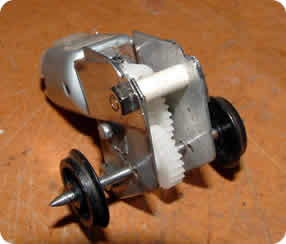
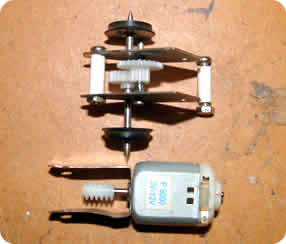
There's nothing too special to the construction. The sides were made from two bits of metal taped together to get each side the same and the axles are just conveniently sized nails! To stop the gears sliding round I used insulation from wires as spacers on the nails.
To get the worm gear to mesh nicely, I made a U shaped bracket so that the height of the worm gear can easily be adjusted. It also makes it easy to get the motor unit into and out of the loco.
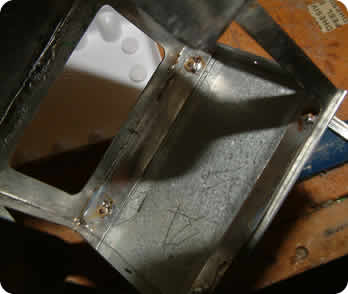
This is the big one. Start by sticking all the patterns to your metal. Then proceed to attack with tin snips and file until smooth. For the grills and windows the usual rules apply: drill four holes in from the corners, then using a jewelers saw connect the dots. Then using a file and liberal doses of patience file away until perfect.
To get square corners : When soldering the corners, I clamp a set-square onto a block of metal to get a perfect right angle. Then I place the first sheet on the metal and butt it up again the set-square. I hold it there using a magnet. Then I slide the second piece down the set-square and press it against the first. I place a do of tack-joins at each end and then solder the whole length, all the while keeping pressure on both pieces (magnets are handy to avoid hot fingers!).
Keeping your options open : Remember that the loco will have a battery inside it which will need to be replaced sometime, so make sure you can get at it! Also, I've made the roof and bonnet removable so that I can get at the various screws holding the loco together. Also, to hide unsightly screws from view, I installed a false floor which just lifts out, revealing a set of screws below.
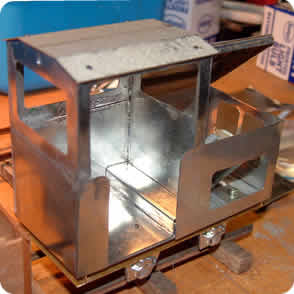
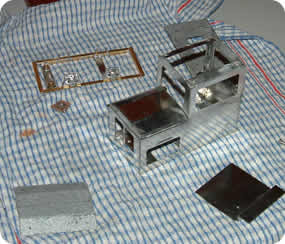
After making the loco sides, cab sides, roof and bonnet, you should end up with something along the lines of...
Wheels are usually the hardest part for me when I'm making anything in 16mm. Luckily I've discovered that quite a bit of old HO/OO stock has metal axles with plastic wheels: perfect candidates for regauging. Simply pry off the old wheels, find an axle (or nail!) to suit and add the wheels. Stand back and admire your handy work!
For the wheels for this loco I opted for pinpoint bearings so I just trimmed the head off the nail, put it in the drill and ground away at it till I had two sharp ends. Simple!
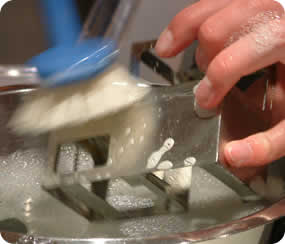
Before painting, you need to remove all traces of grease, oil, blood, sweat, tears and so on. What's needed is a good hot bowl of water with some Handy Andy. Wash all parts liberally, leave them to dry and you're ready to move on to the next step
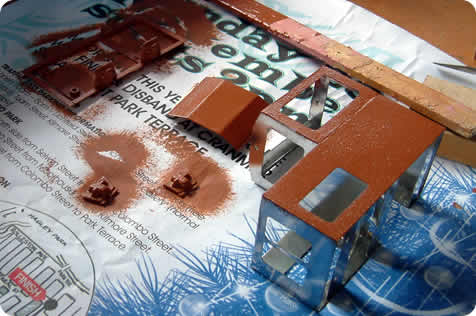
Before you choose what colours to paint everything a good undercoat is needed. Luckily I have a big pot of metal primer and it's the perfect rusty metal colour too: red oxide. To apply I just dab the end of the brush in and rather than paint on the paint, I "splodge" it on, giving a good even coat. It also gives the paint a stucko finish but that doesn't bother me too much. Allow plenty of time for the painting... this is no 10 minute job! Also, don't try and do the whole model at once! Paint a side or two at a time.
Once eveything is painted and has dried for a few days you can start assembling the loco. Not much to say about this part: just makes sure eveything fits. Also, think about where the battery will live, how you'll control the speed, direction etc etc.
I've put a small switch in the cab which controls the power to the motor. Direction control is non-existant thus far! The battery lives in the bonnet and is connected to a tiny strip of Veroboard. In future I hope to wire up a couple of white LEDs as headlights.
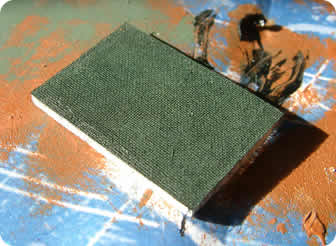
The grills are very easy to do. Simply find some very open-weave cloth, dab on some paint, and let it dry. Meanwhile, build some frames slightly larger than the cut outs and paint these black. Then put a ring of glue round the frame and stick it to the cloth. Trim to size and you should have a good strong little grill. Attach these to the frame with a bit of superglue in each corner. Stand back and admire you handiwork!
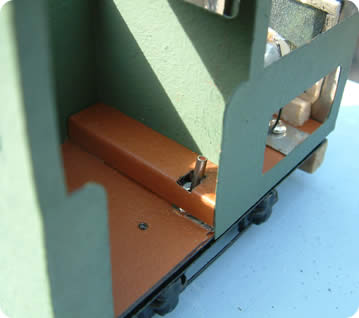
These are made out of good old wood and are screwed into the frames with small M2 sized model engineer bolts. Into this I've stuck a brass dome as a front buffer (can't find another one for the back though!) and made some small side chains from small sections of brass chain. The hooks are just wire bent into the right shape. Simple, but it looks the part.

Since we went to all that effort of making a motor and gearbox for it, we might as well wire it up. I've used a very simple arrangement of battery, switch and motor. The switch is through the floor of the cab and will eventually have an authentic handle attached to it. Bottom of the switch will be hidden by a black surround eventually.
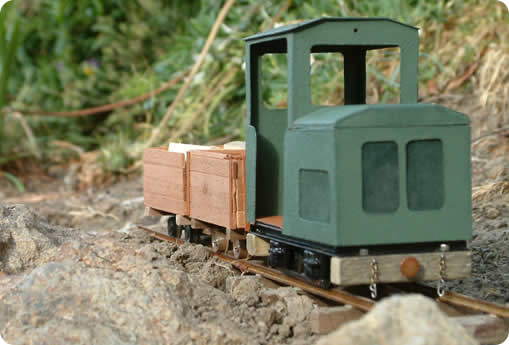
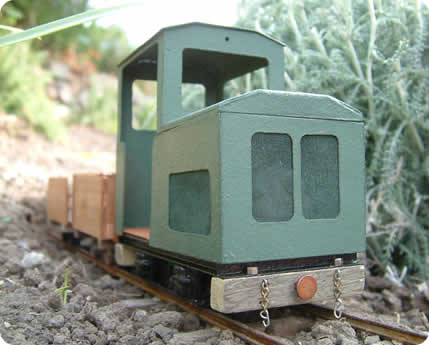
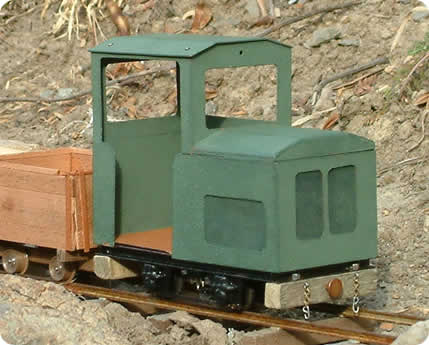
Now that everything is done it's time to have some fun. Here are a few photos I shot on my non-existent garden railway. There is also a short movie available here (1.1mb) and a longer one here (1.7mb)